
AD Hardening
Active Directory Hardening with Testimo
You might ask yourself: “Why do I need to harden my Active Directory? Why should I change something that seems to work just fine?” If those questions sound familiar, it’s probably because you’ve never experienced a cyberattack firsthand and that’s a good thing. I’m genuinely glad you haven’t, and I hope you never will.
I haven’t personally faced such an incident either, but some of my former colleagues have. They didn’t speak lightly about it. They described it as a traumatic experience, one that affected both their physical and mental health. Imagine wondering whether you’ll even have a job the next day, or whether you, as an administrator, might be held responsible for what happened.
It’s no surprise, then, that strengthening the security of one of the most critical components in your IT environment — Active Directory — should be a top priority.
So, without further ado, let me introduce Testimo.
Testimo is an open-source PowerShell module designed to scan your environment for misconfigurations, deviations from best practices, and lesser-known security risks within Active Directory. It provides administrators with clear, actionable insights helping you identify potential weaknesses before they become exploitable vulnerabilities.
If you’re curious to explore more, check out the official GitHub repository:
👉 https://github.com/EvotecIT/Testimo
To begin, we need to install the Testimo module in PowerShell on one of our Domain Controllers (or any system with administrative access to Active Directory). Open PowerShell as Administrator and run the following command:
Install-Module -Name Testimo -AllowClobber -ForceOnce the installation completes, you can run Testimo in the same PowerShell session by invoking the module:
Invoke-Testimo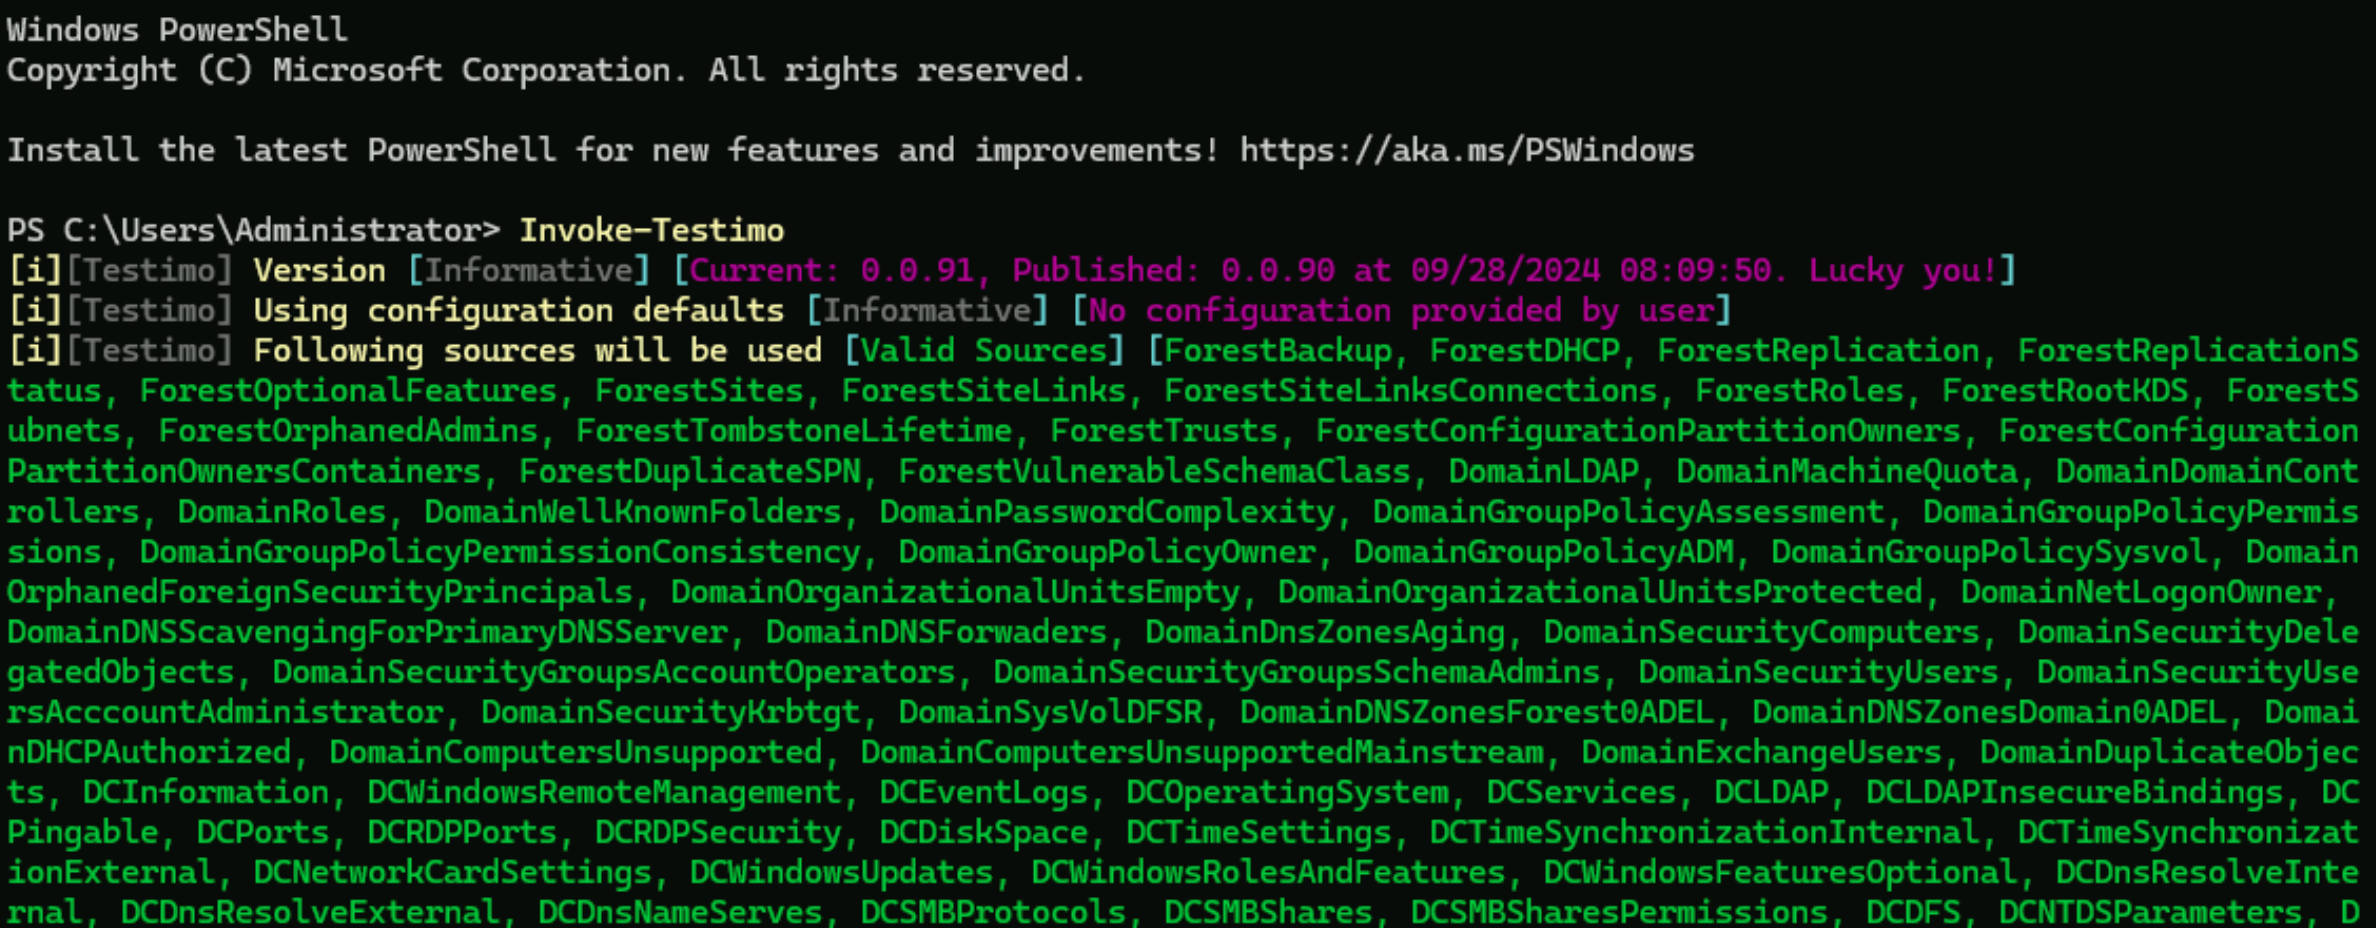
For demonstration purposes, we’ll use a small lab environment as our example. In this lab, we’ll run Testimo and apply some of its recommendations to make our Active Directory setup more secure.
Before we dive deeper, it’s important to remember a few key points:
– Document every change you make to Active Directory. Proper documentation ensures you can revert configurations if something goes wrong.
– Always have a reliable backup or recovery plan in case you accidentally lock yourself out of the domain.
– Communicate with your team, especially other administrators and your manager before implementing changes that could affect the production environment.
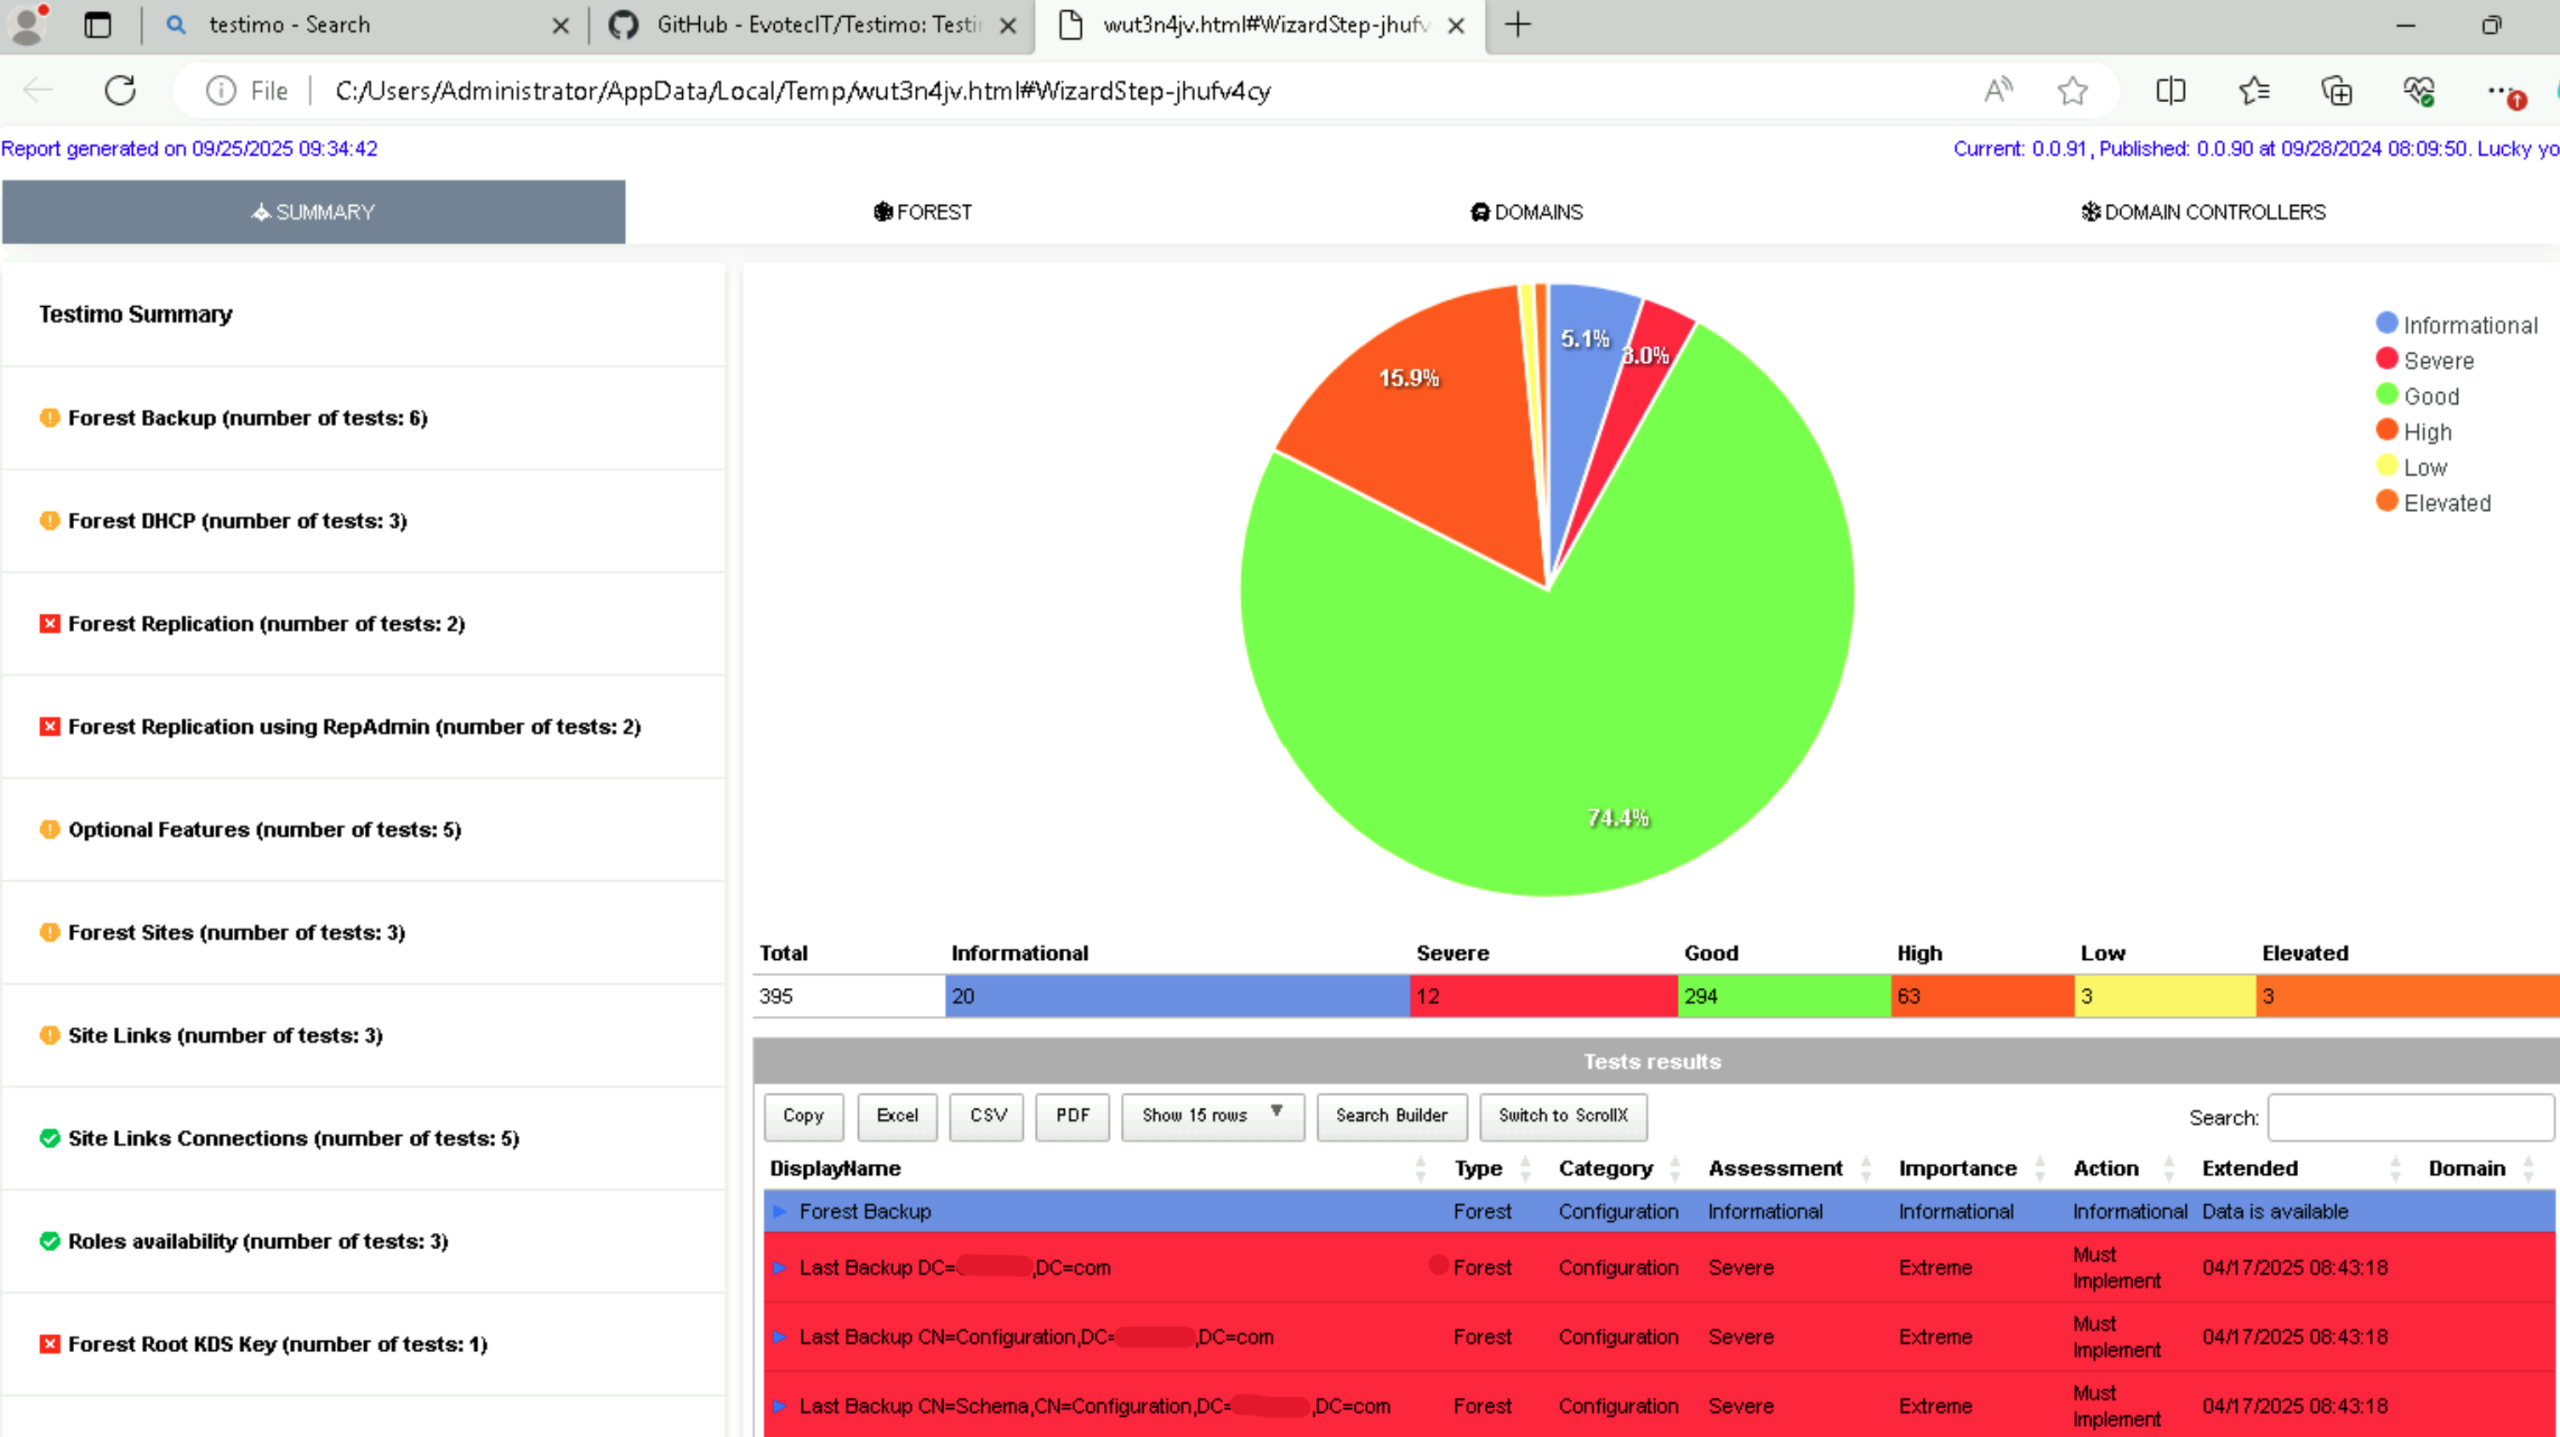
With that said, let’s take a look at our lab environment. Overall, it’s not in terrible shape, but there’s definitely room for improvement.
In the Forest section of the Testimo report, we can see detailed test results from the scan. The first notable finding is that our DHCP (Dynamic Host Configuration Protocol) server is also functioning as a Domain Controller (DC), a configuration that’s not recommended from a security and operational perspective.
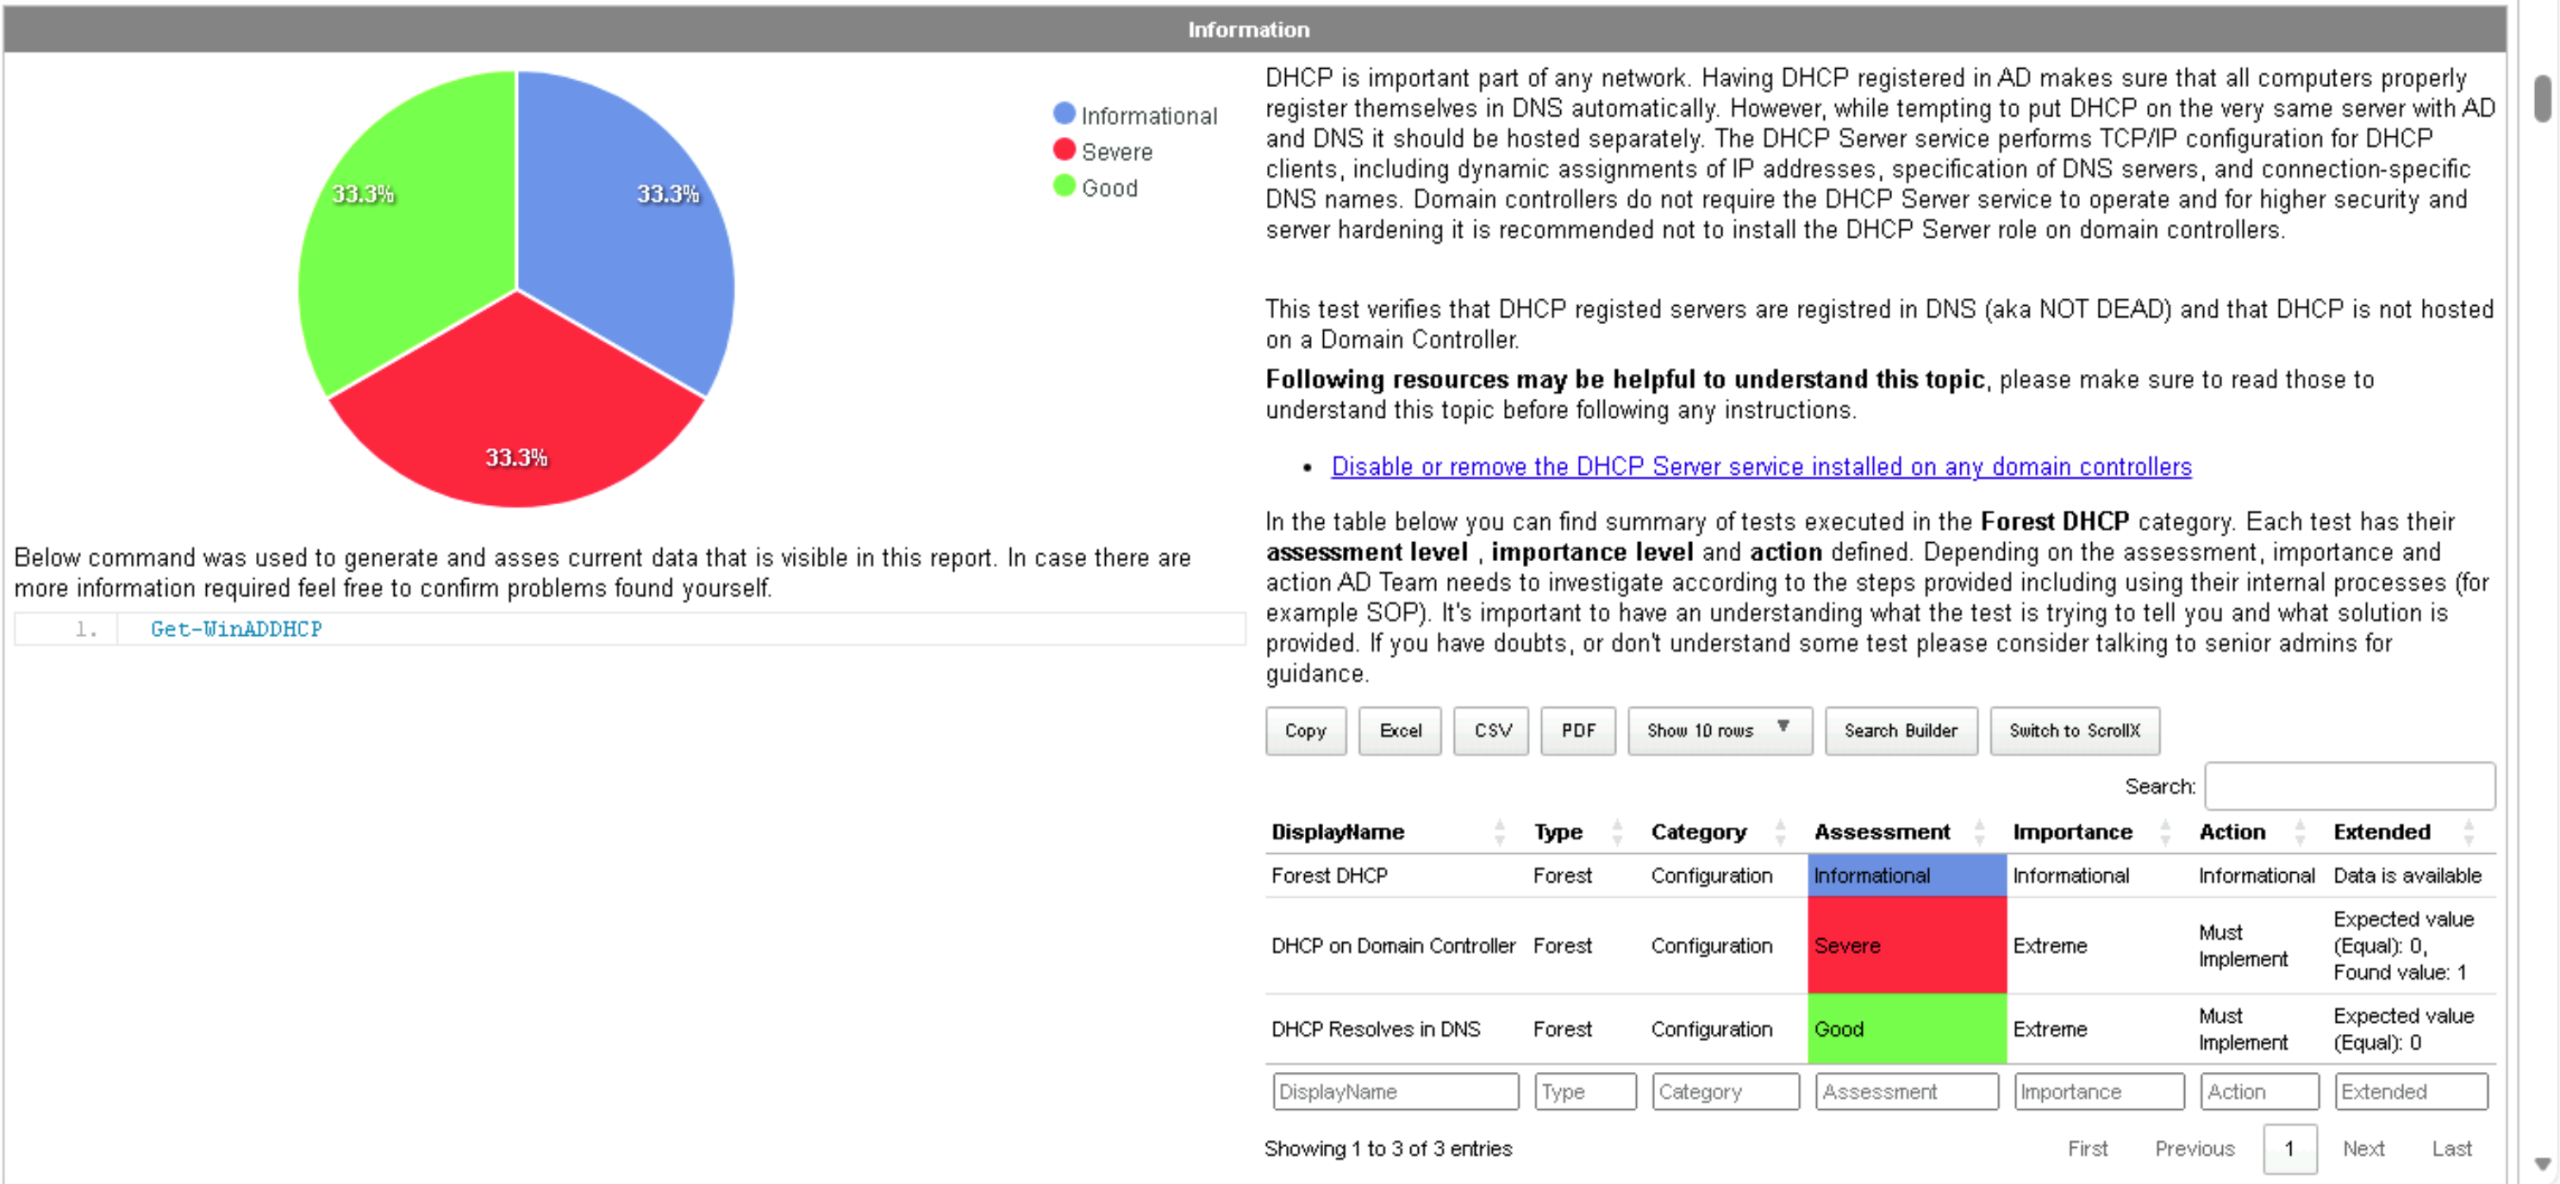
The Testimo report clearly explains what DHCP (Dynamic Host Configuration Protocol) is, why it’s needed in a network, and why it shouldn’t run on a Domain Controller. According to Microsoft’s best practices, it’s recommended to host DHCP on a dedicated server rather than on a DC. This separation reduces the attack surface and ensures that any issues affecting DHCP services don’t compromise your domain’s authentication and authorization systems. We may publish a detailed tutorial in the future on how to set up and properly configure a standalone DHCP server, but for now, remember this key takeaway:
Always try keeping DHCP separate from your Domain Controllers.
The next issue highlighted in the Testimo report was that our Active Directory Recycle Bin was not enabled. This means that if any objects (such as users, computers, or groups) were deleted, they could not be restored. From my experience, the Recycle Bin is a real lifesaver. I use it to restore deleted objects almost every month, and sometimes even recover items that were deleted six months ago. You can imagine how valuable that is when an important user account or group gets removed by mistake.
To enable the Active Directory Recycle Bin, I used the following PowerShell commands. These commands also configure the system to retain deleted objects for up to one year.
However, keep in mind that once the Recycle Bin feature is enabled, it cannot be disabled so plan and document this change carefully before proceeding.
Import-Module ActiveDirectory
(Get-ADForest).RecycleBinEnabled
$forestRoot = (Get-ADForest).Name
Enable-ADOptionalFeature `
  -Identity 'Recycle Bin Feature' `
  -Scope ForestOrConfigurationSet `
  -Target $forestRoot `
  -Confirm:$false
To inspect the current values, you can use:
$cfgDn = (Get-ADRootDSE).configurationNamingContext
$dirSvc = "CN=Directory Service,CN=Windows NT,CN=Services,$cfgDn"
Get-ADObject -Identity $dirSvc -Partition $cfgDn -Properties msDS-deletedObjectLifetime,tombstoneLifetime | Select-Object msDS-deletedObjectLifetime,tombstoneLifetime
And if they are not how you would like you can set them using the following commands:
Set-ADObject -Identity $dirSvc -Partition $cfgDn -Replace @{ 'tombstoneLifetime' = 360 }
Set-ADObject -Identity $dirSvc -Partition $cfgDn -Replace @{ 'msDS-deletedObjectLifetime' = 360 }
You can, of course, replace the value of 360 days with any duration that fits your organization’s retention policy.
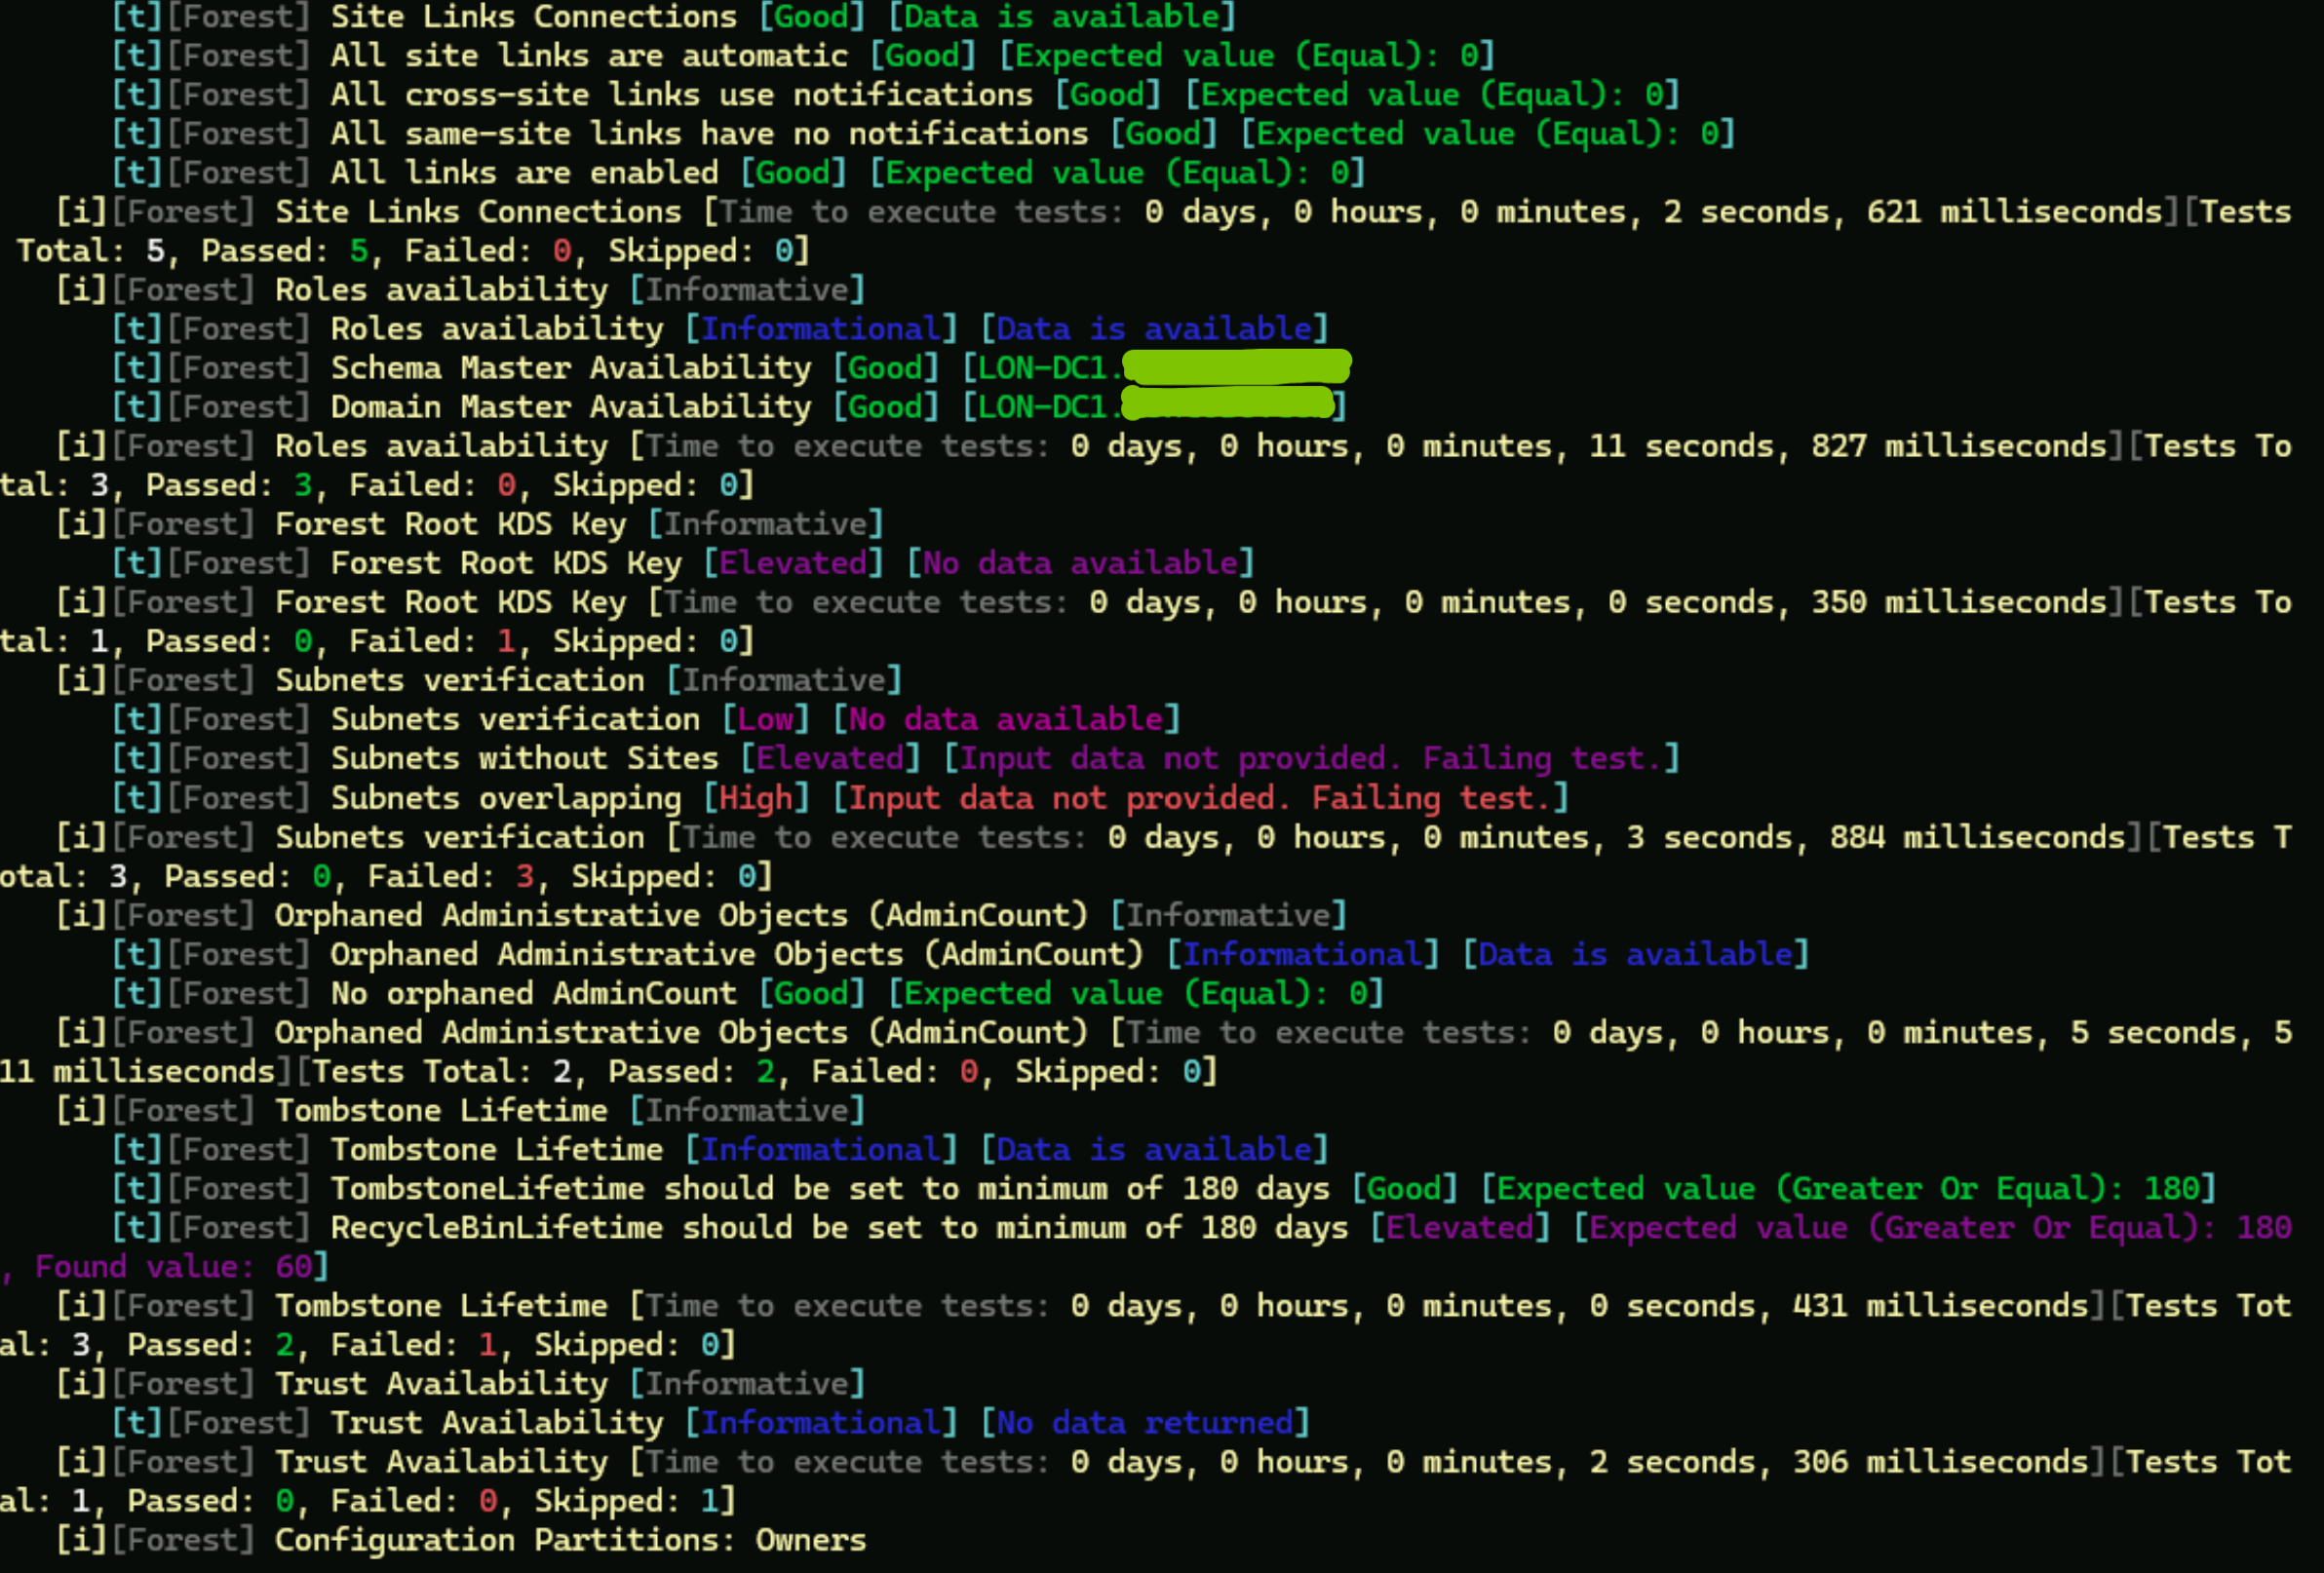
Next, we notice that our Active Directory Forest does not have a Root Key Distribution Service (KDS) key.
This key is required for generating and managing passwords for Group Managed Service Accounts (gMSAs). These accounts are special types of service accounts designed to automatically change their passwords at regular intervals improving both security and manageability.
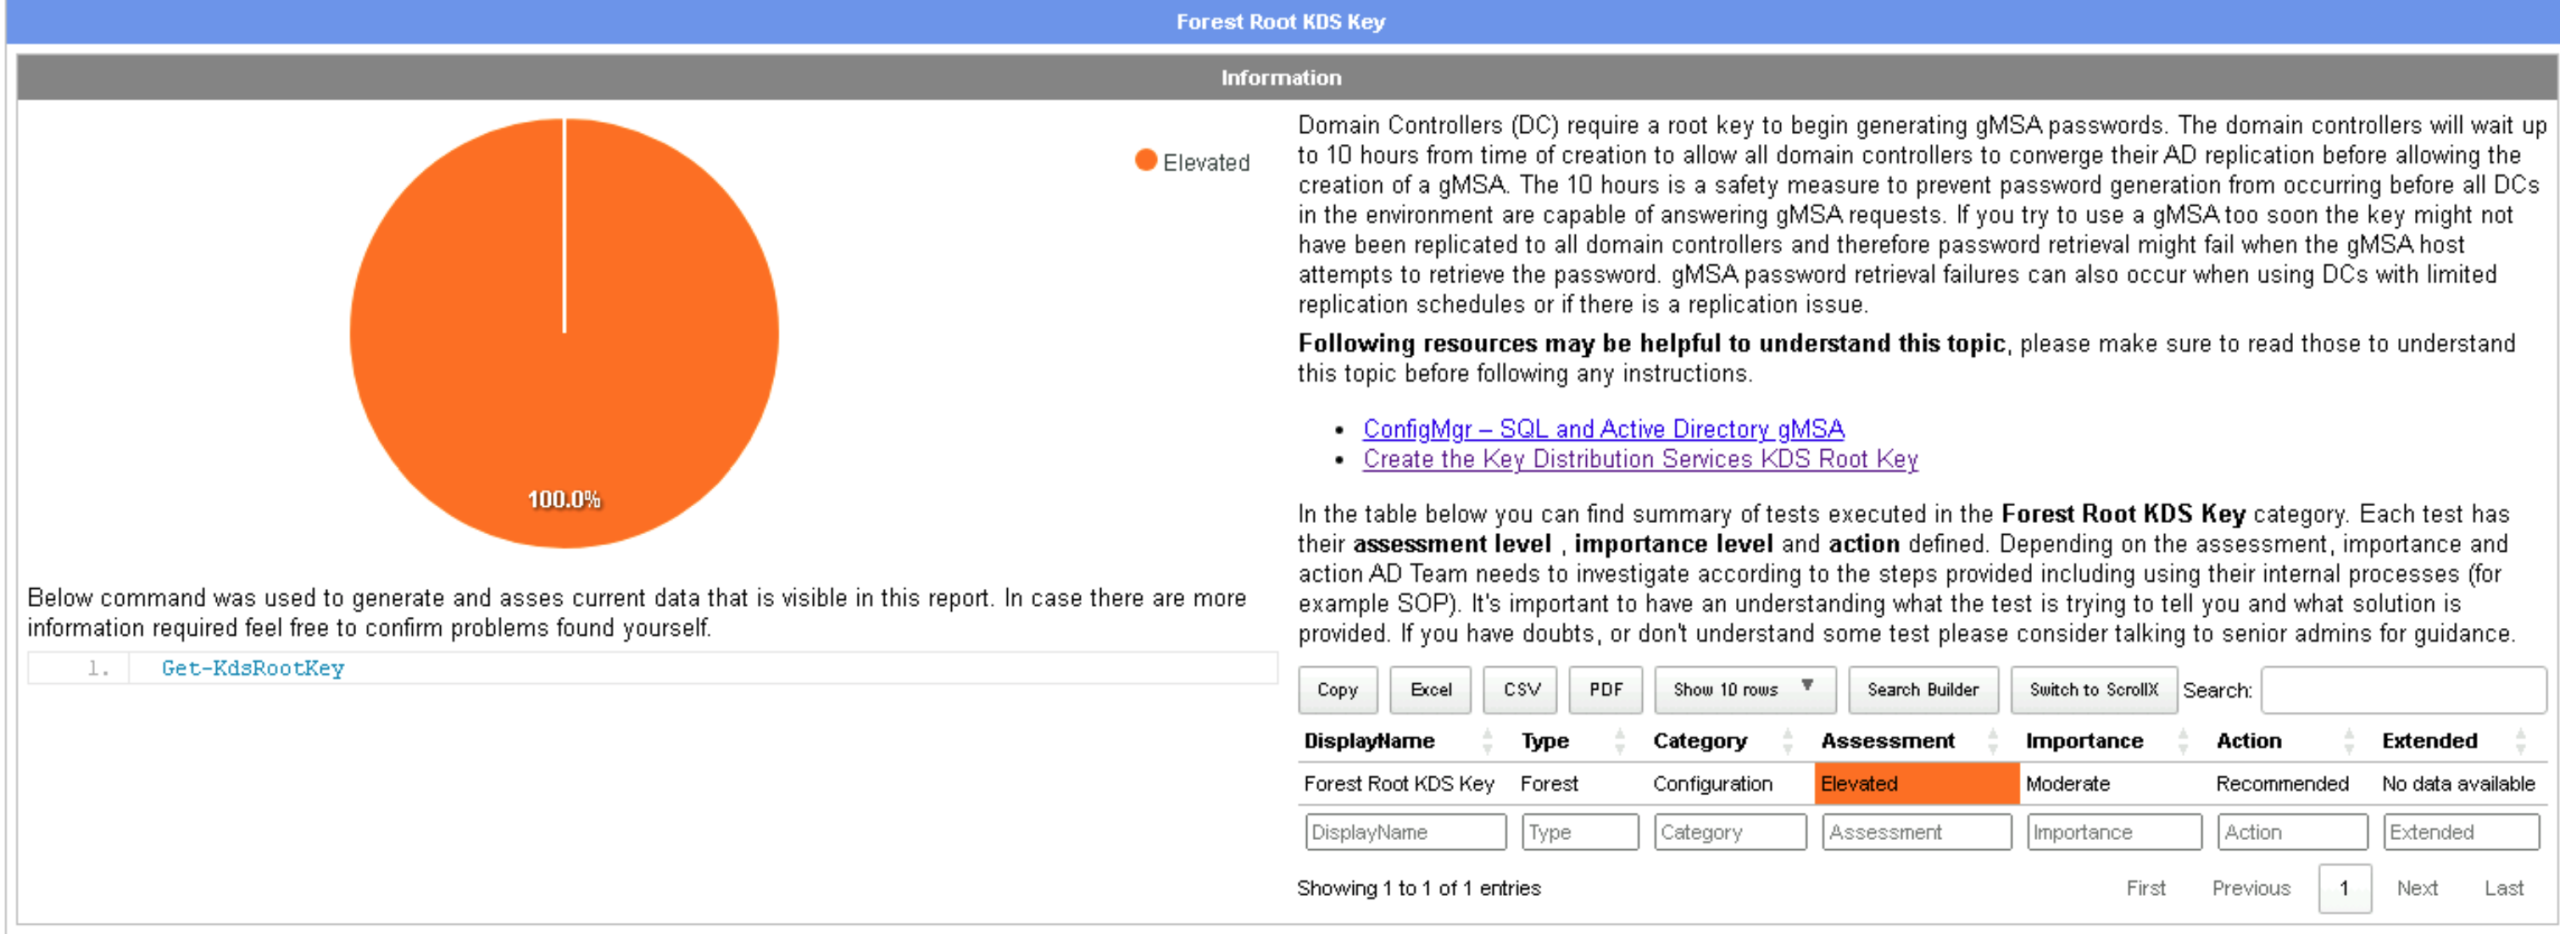
To generate the Root KDS key, we can use a simple and quite elegant PowerShell command:
Add-KdsRootKey -EffectiveTime ((Get-Date).AddHours(-10))This command creates the Key Distribution Service Root Key that your forest will use to generate passwords for Group Managed Service Accounts (gMSAs). The parameter -EffectiveTime ((Get-Date).AddHours(-10)) sets the key’s activation time to 10 hours in the past. By default, Active Directory requires up to 10 hours for the new key to replicate across all Domain Controllers. Using this parameter allows you to bypass the waiting period and start using gMSAs immediately, assuming your replication has already converged.
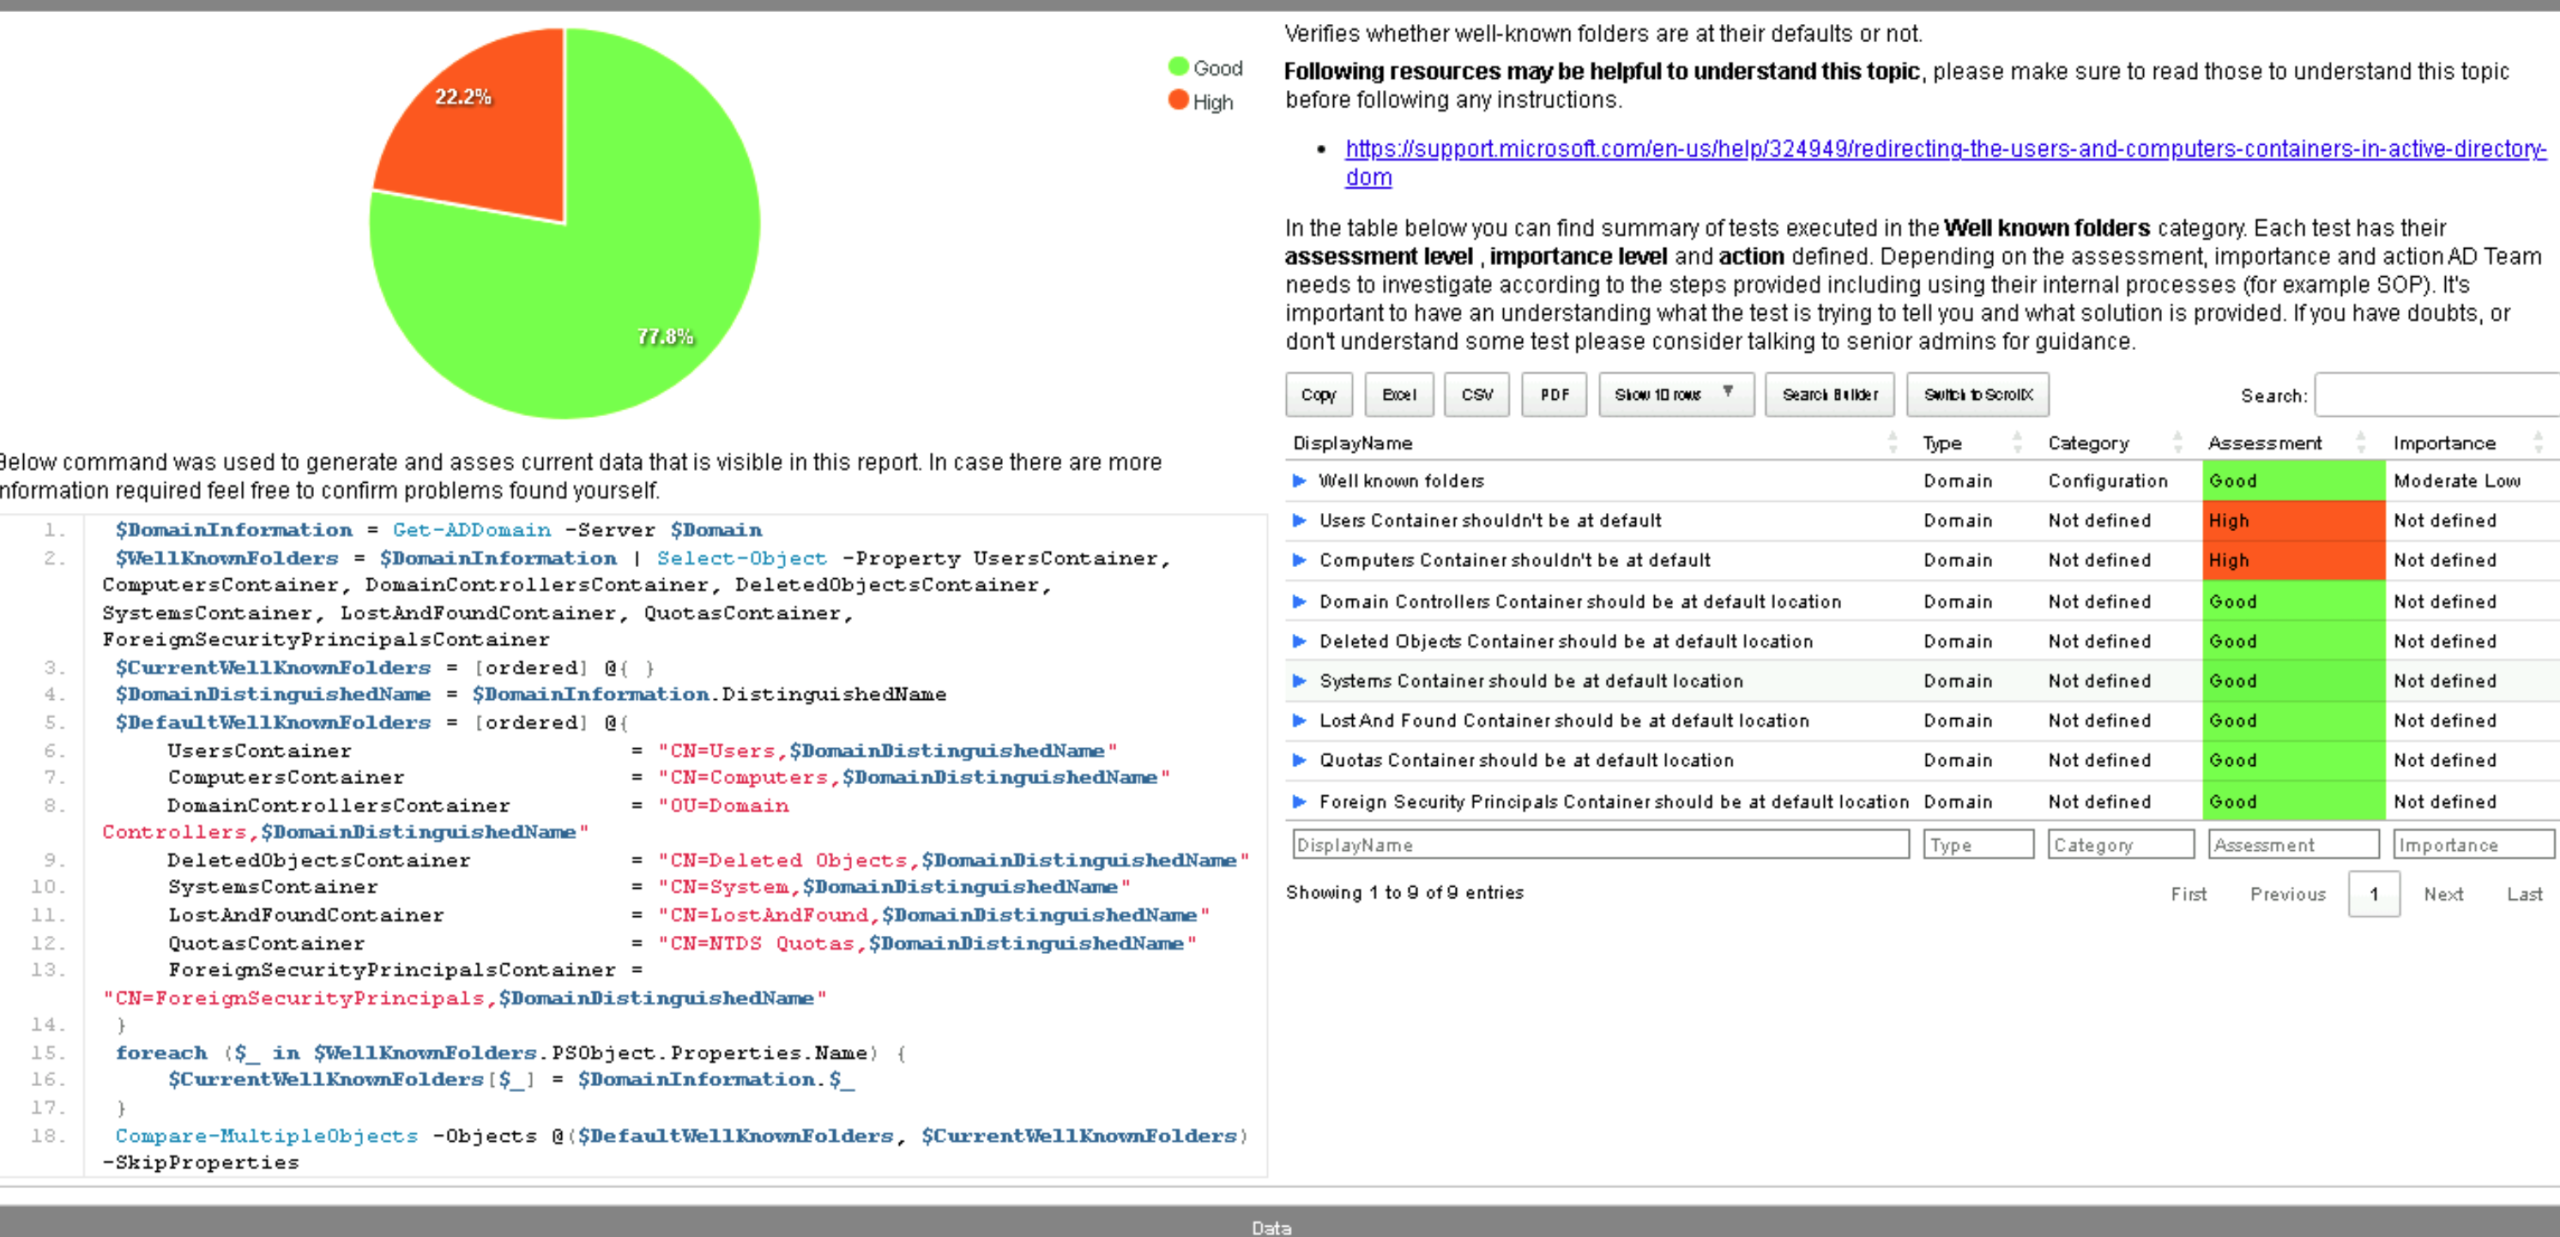
Another very common issue identified by Testimo is that we are still using the default “Users” and “Computers” containers in Active Directory.
These default containers have a major limitation. You cannot directly link Group Policy Objects (GPOs) to them. As a result, only domain-level policies (those applied to the entire environment) will affect the user and computer accounts inside these containers. This severely limits your ability to apply granular security policies or manage configurations at an organizational level. From a hardening perspective, it’s best practice to create custom Organizational Units (OUs) and move your user and computer accounts there. This allows you to apply targeted security and management policies while keeping the environment clean and organized.
Just for informational purposes, when you join a new computer or create a new user account in the domain, they are automatically placed in the default containers CN=Users for user accounts and CN=Computers for computer accounts. Since we cannot link Group Policy Objects (GPOs) directly to these default containers, it’s best practice to redirect new objects to dedicated Organizational Units (OUs) where we can intentionally apply security and configuration policies. This helps ensure that every new computer or user automatically receives the correct policies and settings from the moment they’re added to the domain.
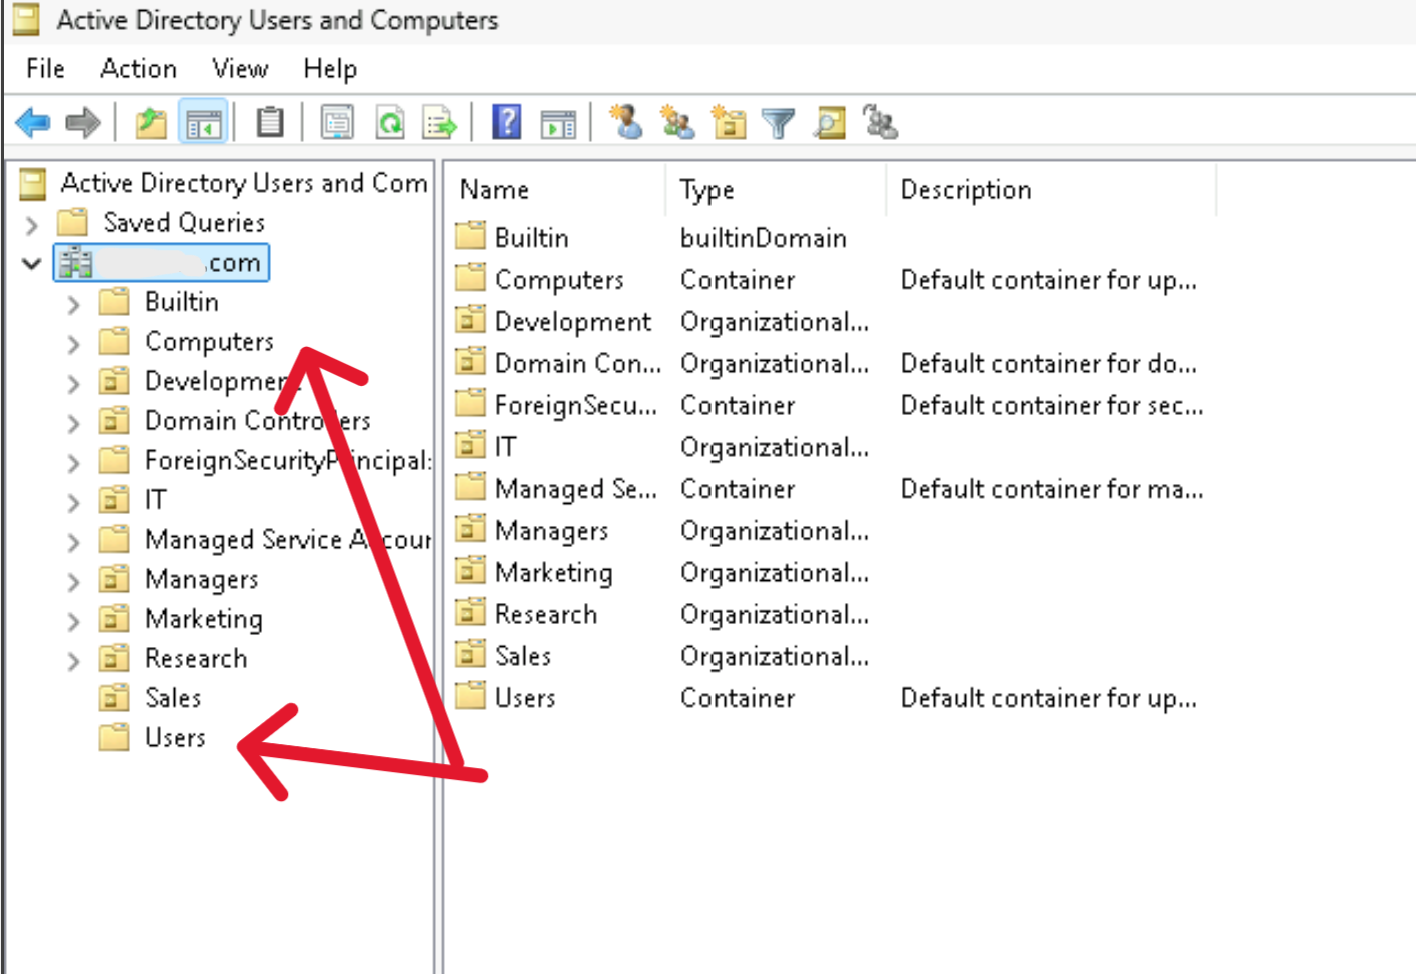
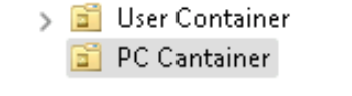
First, we’ll create two Organizational Units (OUs) — one for Users and another for Computers. (And yes, please ignore any misspelling in the screenshot and command!)
Next, to redirect the default enrollment paths for new computers and users, we’ll use the Command Prompt.
– Open CMD as Administrator.
– Run the following commands, adjusting the OU and domain names to match your environment:
redircmp "OU=PC Cantainer,DC=Your-Domain,DC=com"
redirusr "OU=User Container,DC= Your-Domain,DC=com"
This configuration ensures that:
– Any new computers joined to the domain are automatically placed in the PC Container OU.
– Any new user accounts created in the domain are automatically placed in the User Container OU.
Here’s an example of how the commands would look when entered in Command Prompt:

Next, we’ll encounter some issues with our security settings.
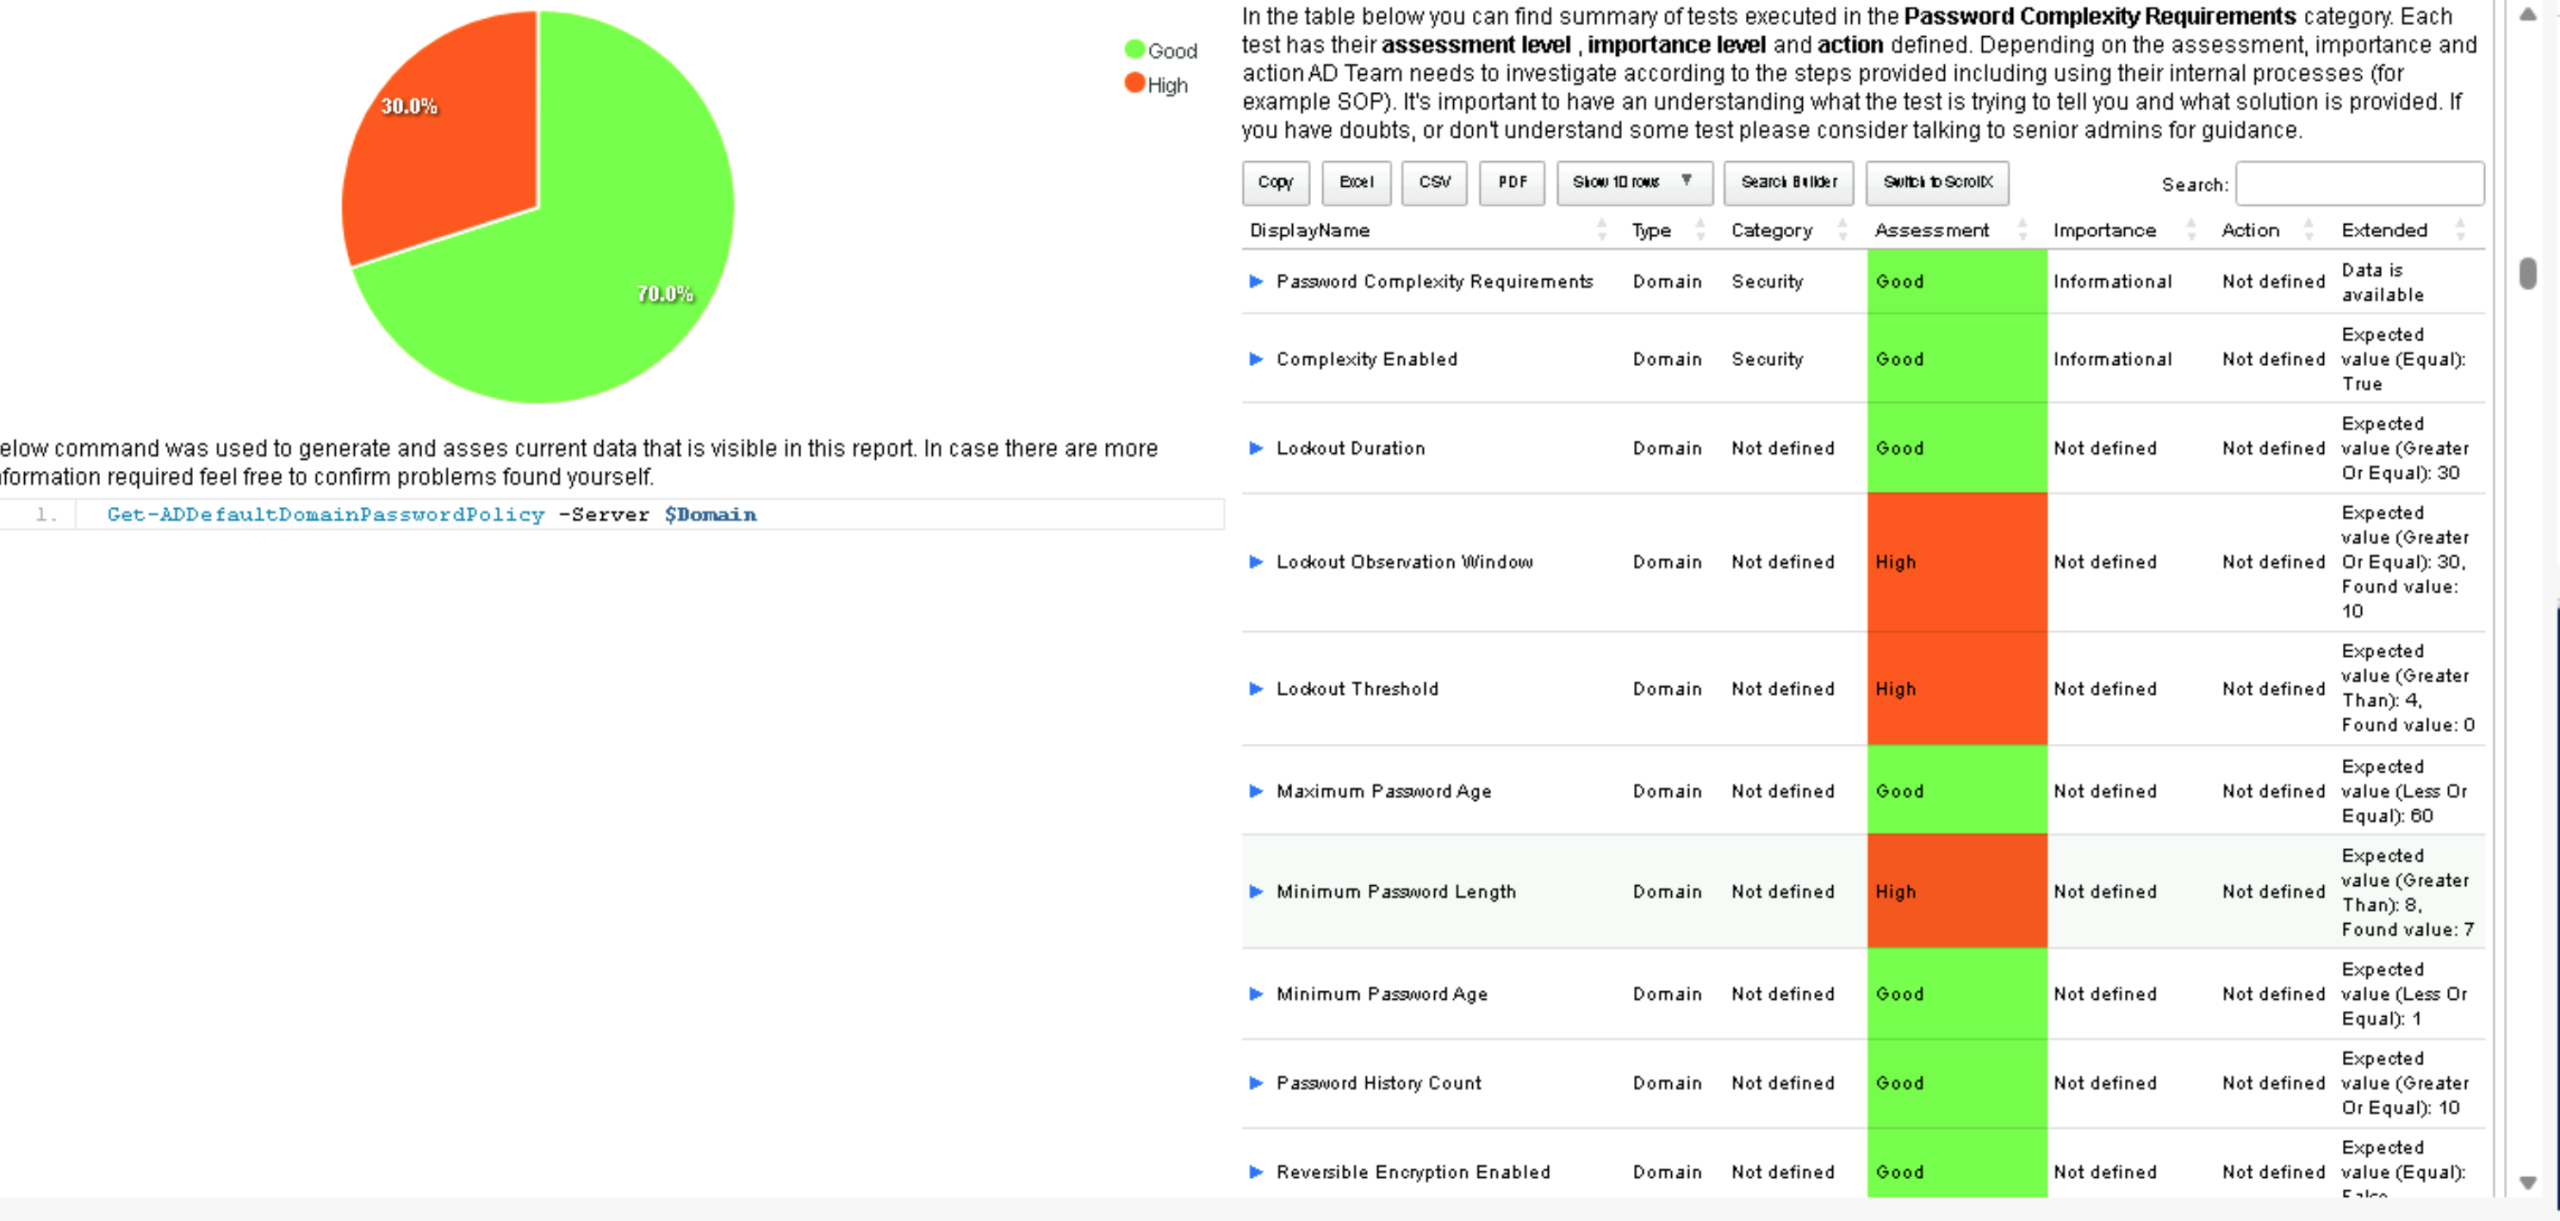
The first issue we’ll address is the “Minimum Password Length.” Testimo found the current value set to 7, while the recommended value is 8.
This means users are allowed to create passwords with at least 7 characters, but Testimo suggests increasing it to 8 for better security.
So, how do we enforce longer passwords? We’ll go to Group Policy Management:
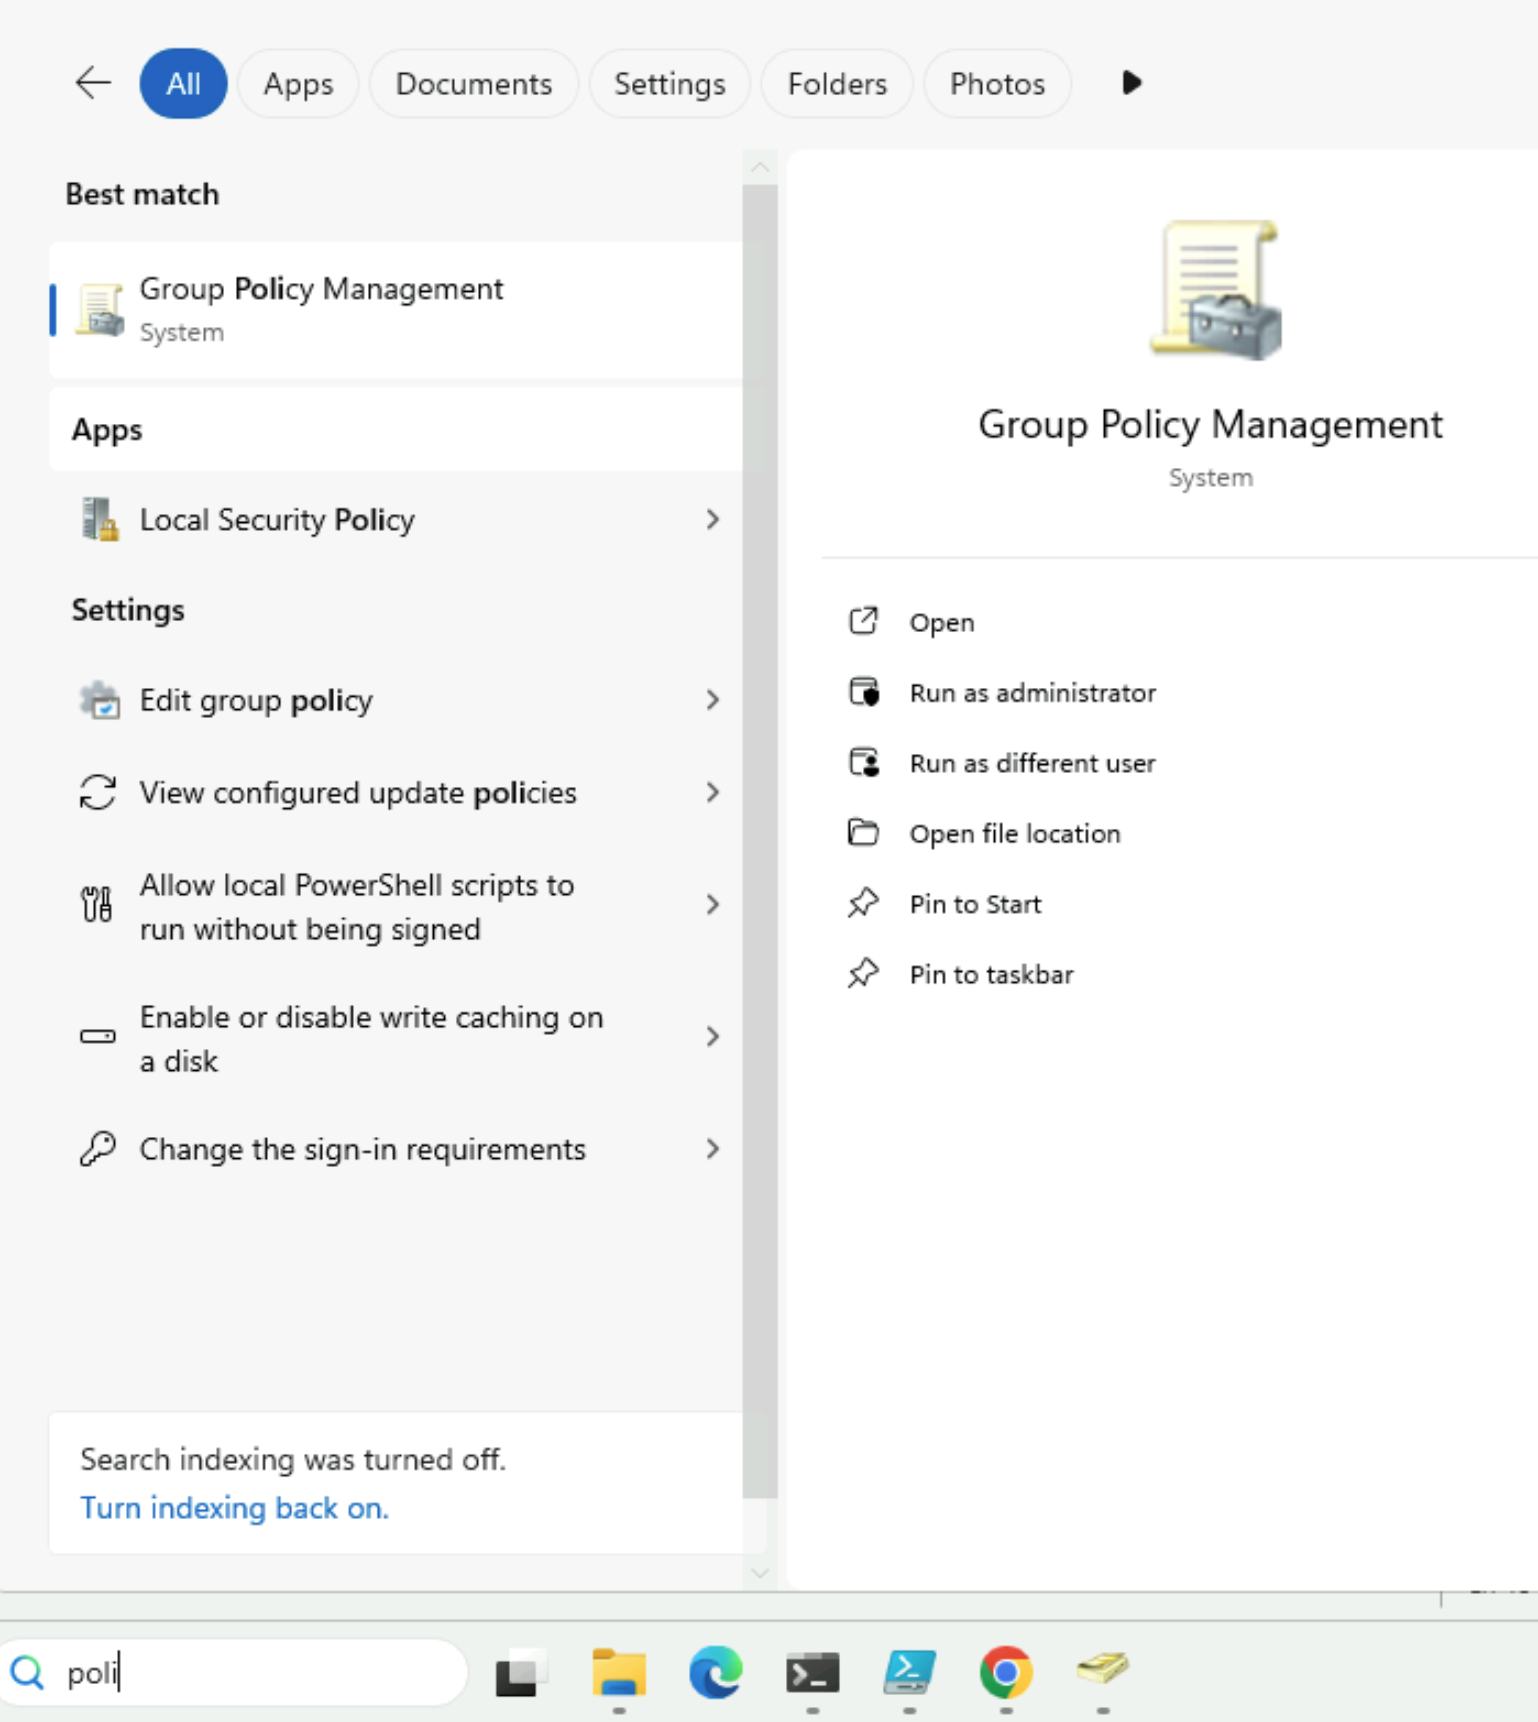
Next, open Group Policy Management on your Domain Controller. In the left pane, navigate through the following path:
Forest → Your Domain → Domains → Your Domain → Default Domain Policy
Once there, right-click on the Default Domain Policy and select Edit.
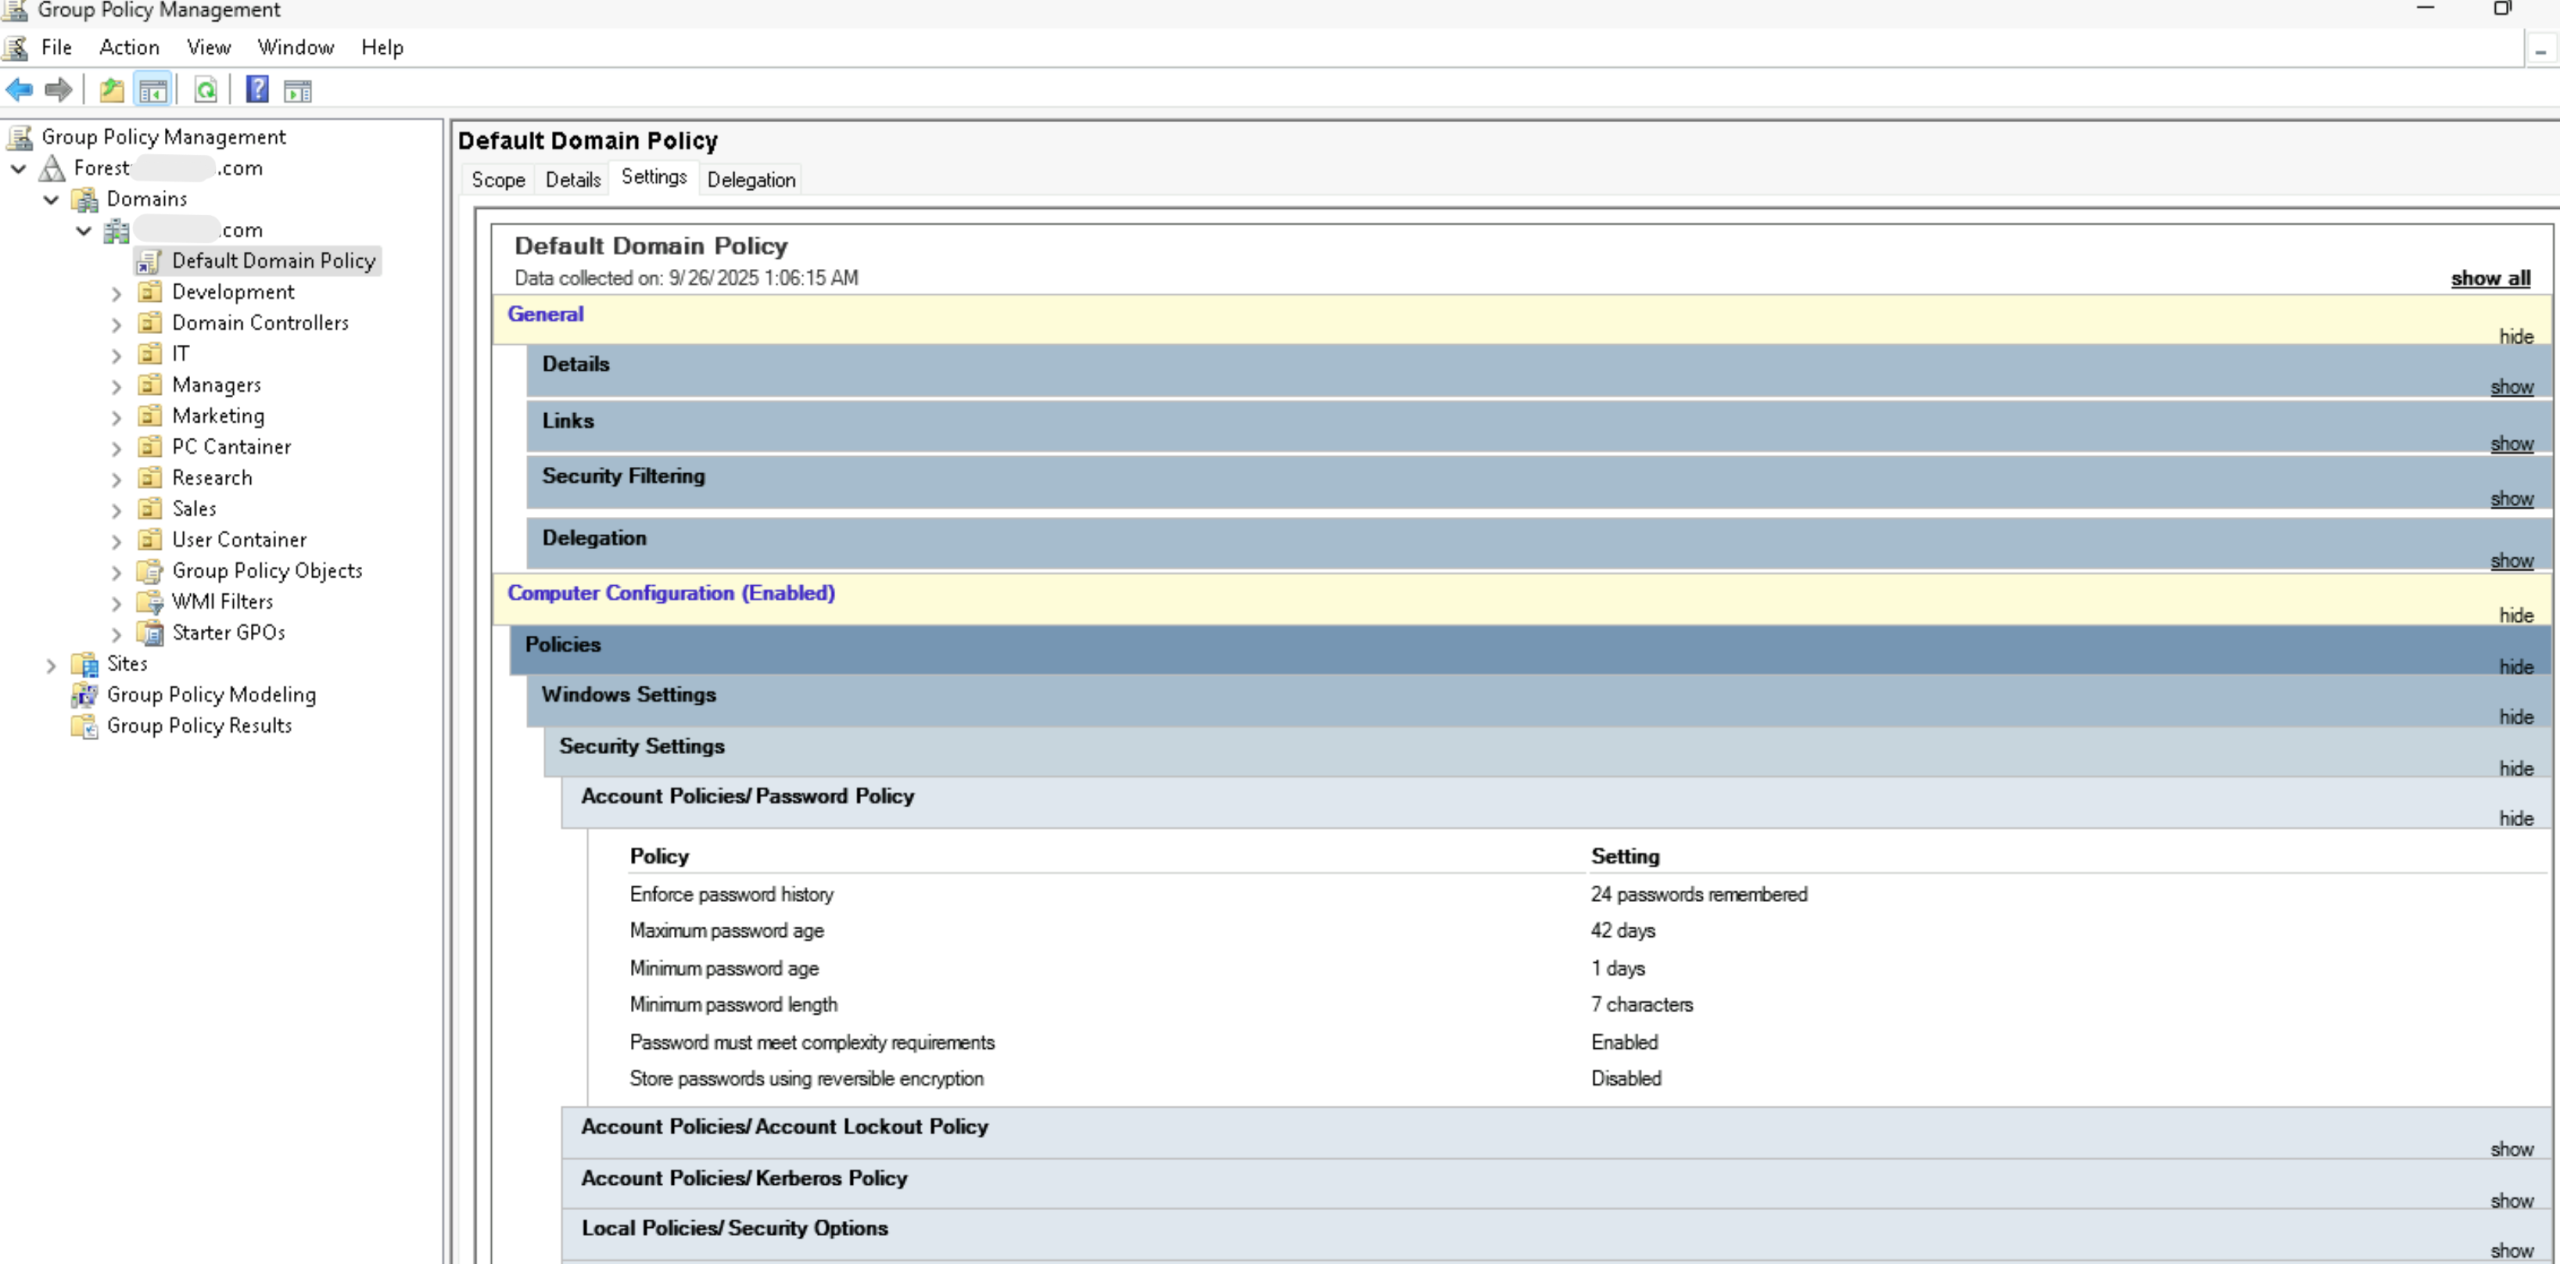
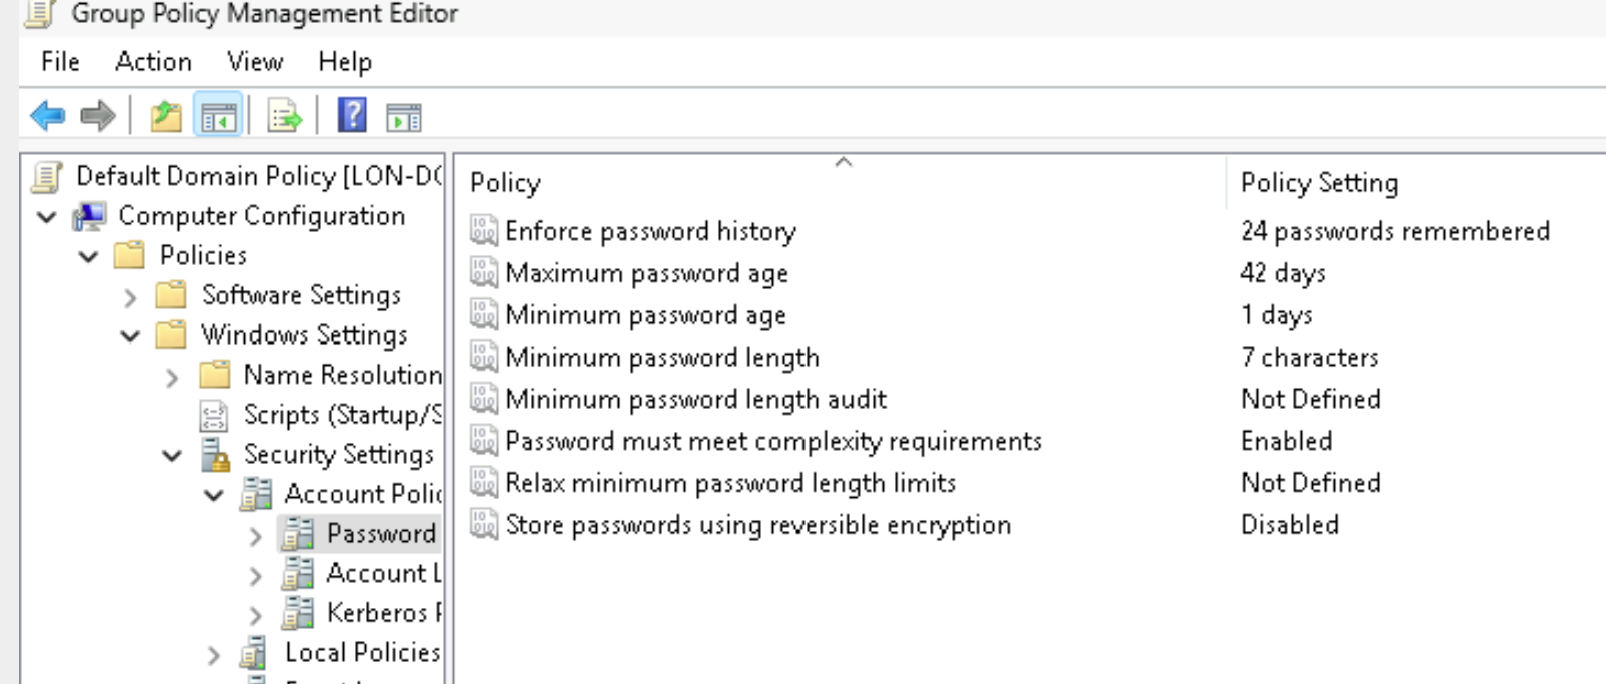
Another window will open — the Group Policy Management Editor. Inside it, expand the following path:
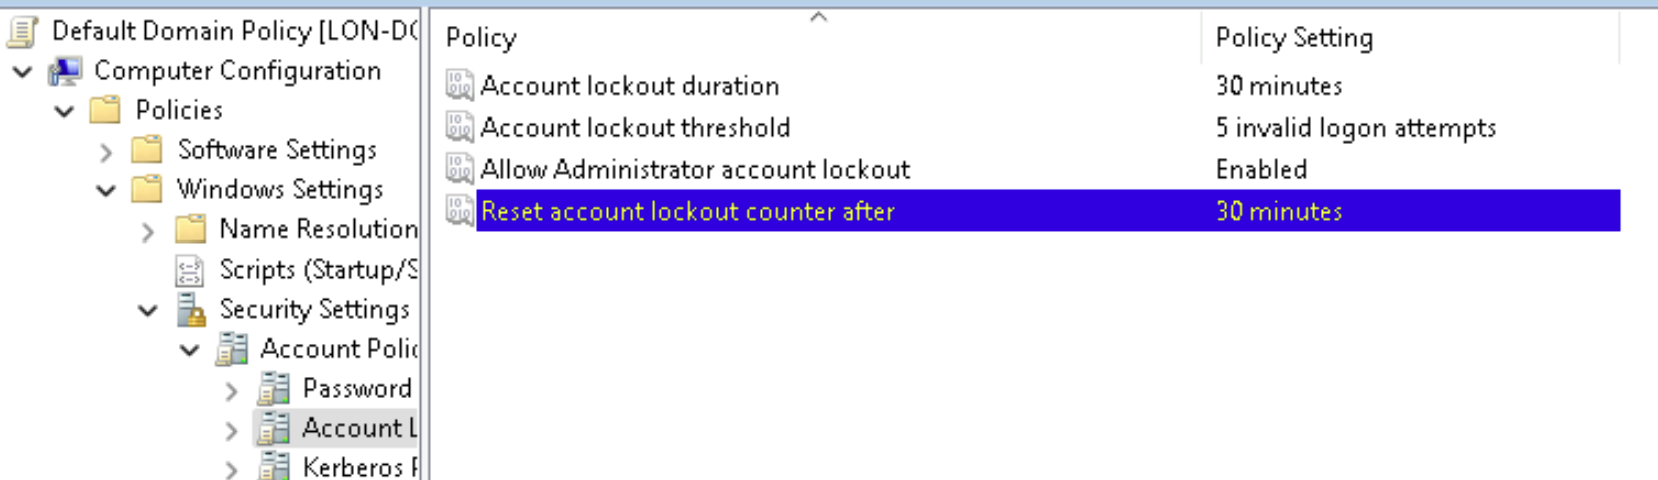
Default Domain Policy → Computer Configuration → Policies → Windows Settings → Security Settings → Account Policies → Password Policy
Here, you’ll find the Minimum Password Length setting. Double-click it and set the value to 8 characters (or higher, if your organization’s policy requires).
Click Apply, then OK to save your changes.
This ensures that all new passwords created in the domain must meet the minimum length requirement recommended by Testimo
Next, we still have an issue with the Account Lockout Policy. In our current configuration, the Lockout Observation Window is set to 10 minutes, and the Lockout Threshold is set to 3 (although Testimo couldn’t read the value properly, so it displayed 0). This means that if a user enters their password incorrectly, a 10-minute countdown begins.
If they type the wrong password twice, wait 10 minutes, and then try again twice more, their account will not be locked, because the failed attempts are outside the observation window. However, if the user enters their password incorrectly three times in a row within 10 minutes, their account will be locked out.
Testimo recommends increasing the observation window to 30 minutes and allowing four failed attempts before a lockout occurs, meaning a threshold value of 5.
This strikes a better balance between security and usability, preventing brute-force attempts while reducing accidental lockouts for legitimate users.
I hope you enjoyed this short tour through Testimo and our brief Active Directory hardening experience.
Most of the testing and review process was refined and supported by artificial intelligence, helping us ensure accuracy and clarity throughout the guide.
If you have any questions or suggestions, feel free to leave a comment below 🙂
Leave a Reply